10 Tips To Prepare Your Roof
For Winter In The PNW
How Do I Get My Roof Ready For Winter?
It happens every year as winter is fast approaching, we get an increase in calls from people asking about “winterizing” their roof. While some flat roofs can have additional coatings applied, most residential roofs require a multi-pronged approach to preparing them for the wind, snow, and rain we experience here in the Seattle / Tacoma area.
10 things you can do to help your roof
survive another winter in the PNW:
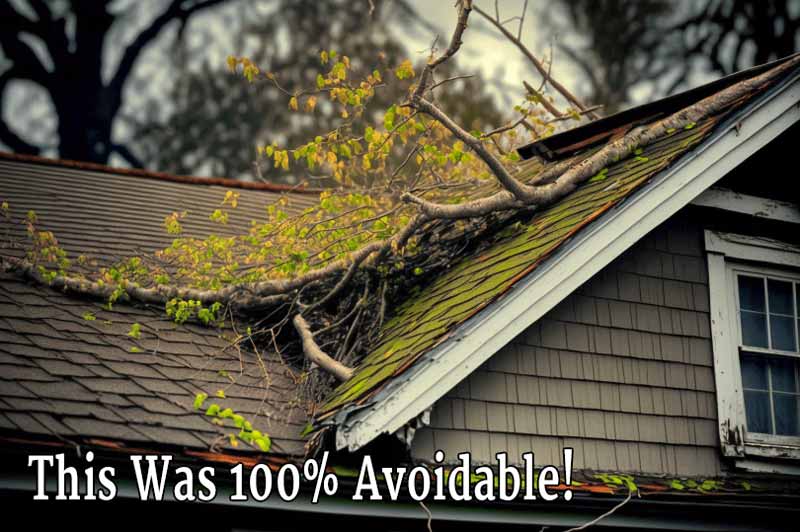
#1 - Trim The Surrounding Trees
While spring is the traditional time to trim trees, you can keep your roof from being damaged in winter by removing any large overhanging limbs. Branches that look weak or might scrape your roof in the wind should also be removed. Obviously the most damage would come from a large tree limb landing on your roof, small branches can wear away your roofing over time with even a gentle rubbing back and forth.
Another good reason to do some tree trimming in the fall is that it keeps additional leaves and pine needles from collecting in your gutters and on the surface of the roof. The buildup of debris can promote growth of moss and algae.
#2 - Clean and Inspect Your Gutters
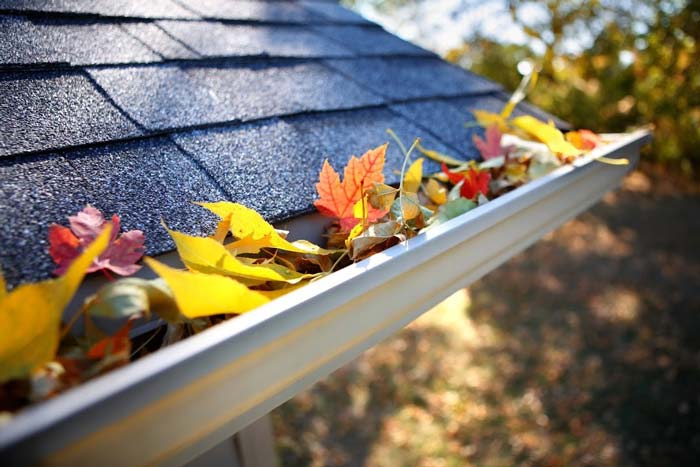
Most of us enjoy the colors of fall here in the PNW. This stunning display of natural beauty is great for walks in the crisp autumn air, but once those leaves fall from the trees, they end up clogging gutters and downspouts.
We’ve covered several ways of safely removing debris from your gutters in the past, but this is the time of year when you want your roof’s drainage system to be in peak performance. Many homeowners assume that if they have “Gutter Guards” that they don’t need to worry about their gutters becoming full of debris, but that’s simply not true. While some types of gutter systems have a guard in place to limit the amount of leaves and debris that enters them, they aren’t foolproof or guaranteed to stay completely free of clogs.
We recommend using a hose and checking the rate water comes out the downspout. If it seems like it’s taking a long time or you can visually see water spilling over the edge of the gutter, that is a good sign that your gutters need to be cleaned and serviced.
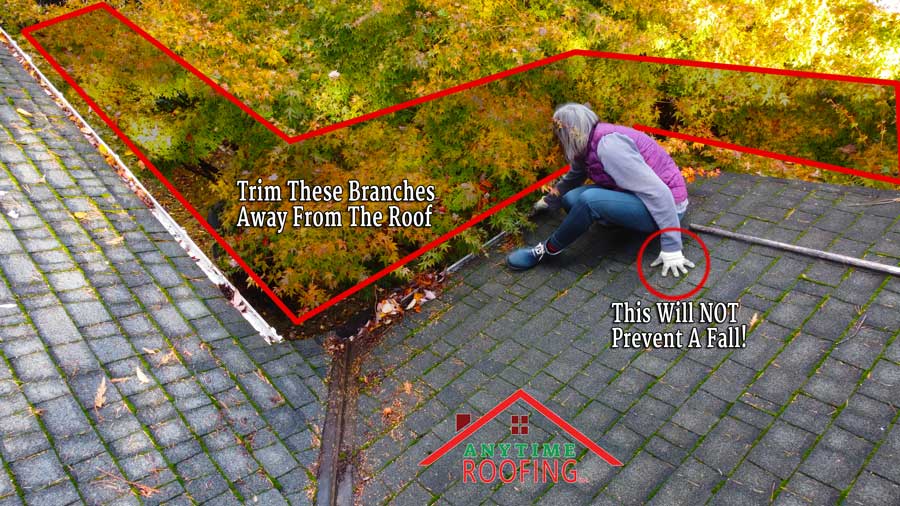
Bonus Tip: It's Not Worth The Risk!
Tree trimming and gutter maintenance is something that many homeowners prefer to do themselves rather than paying a professional. This common practice works out well for the majority of people who are safety minded and cautious. However, our legal department wants us to point out a few things:
>> Please use fall protection! Anchor points can easily be installed near your roofs ridge line and harness systems are relatively cheap compared to the potential risks.
>> Please use extra caution when working near the edges of the roof (where the gutters are located). In many cases it’s better to access the gutters from a ladder even though it requires more frequent adjustments of the location to prevent working beyond a safe reach distance.
>> Be sure to anchor the footing of the ladder to prevent it from ‘walking’ away from the wall. Ladders should ideally be positioned at a 75 ° angle to ensure a good center of balance and prevent it from slipping. The rule of thumb is using a 4:1 ratio (1 foot out from the top for every 4 feet in height).
>> Don’t just trim your trees and clean your gutters, but also remove any leaves and debris from the valleys and corners of your roof where they’ve become trapped. Doing so now will allow the surface of the roof to breathe and extend the life of your roof. Depending on how wet or entrenched the debris is, a majority of it can be blown off with a leaf blower. However, be sure to have a good footing as the blower can easily knock you off balance. The other thing to remember is ALWAYS DIRECT THE BLOWER DOWNWARD. If you’re pointing the stream upwards, you can easily force debris under the layers of shingles or cause them to separate or become dislodged.
#3 - Insulate Your attic
Your attic is probably already insulated so you might be tempted to skip over this step without any thought. However, over time some insulation types can settle, become damp, or lose their insulating properties for a variety of reasons. Ensuring you have adequate insulation over your head will serve a few purposes.
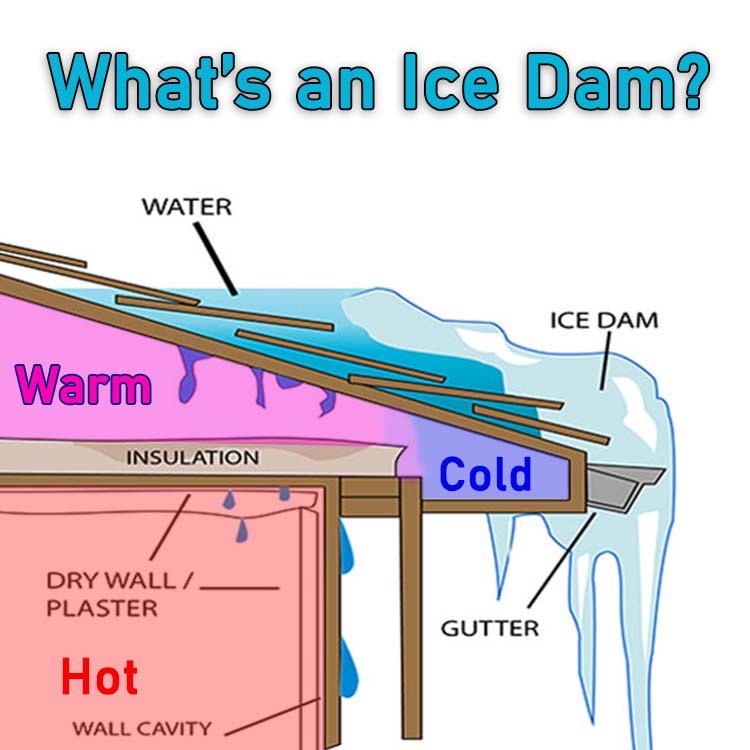
Insulation keeps the house warmer in the winter and promotes energy savings and is generally better for the environment. The real reason we mention this in regards to your roof is to prevent Ice Dams. This happens when heat escapes all the way out at the narrowest sections of the roof. These areas also happen to be the hardest areas to visually inspect (without a thermal camera).
Depending on the altitude you live at, freeze events in our area used to be fairly uncommon. That said, in recent years we’ve seen unusual weather patterns and winter storms that have stalled over the PNW bringing overnight temps to below freezing for several days in a row. When this happens and the daytime temps creep up past the freezing point in the mid day, it creates the perfect conditions for ice dams to occur.
#4 - Have Your Roof Inspected
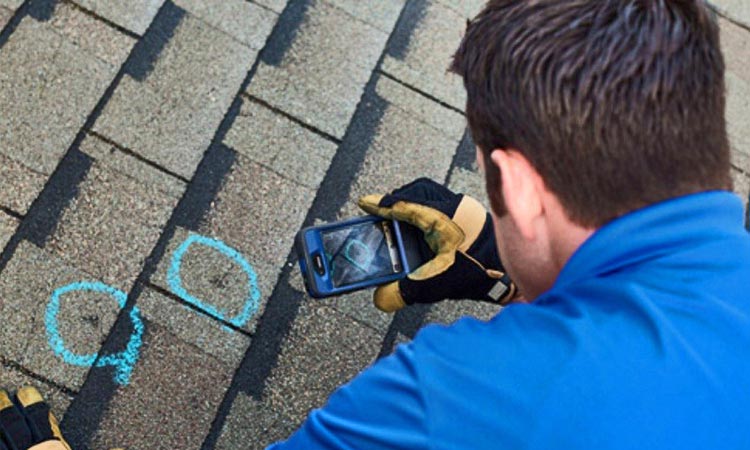
Roof inspections are the single best thing you can do to prevent larger problems from popping up to surprise you. Just like changing the oil in your car or replacing the batteries in your smoke alarms, most of us know it’s something that needs to be done. Unlike those other examples though, it’s easier to forget about performing this essential task until there are signs of a problem. Your house doesn’t have a “Check Roof Light” that will come on, so it’s up to you as a homeowner to schedule regular roof inspections.
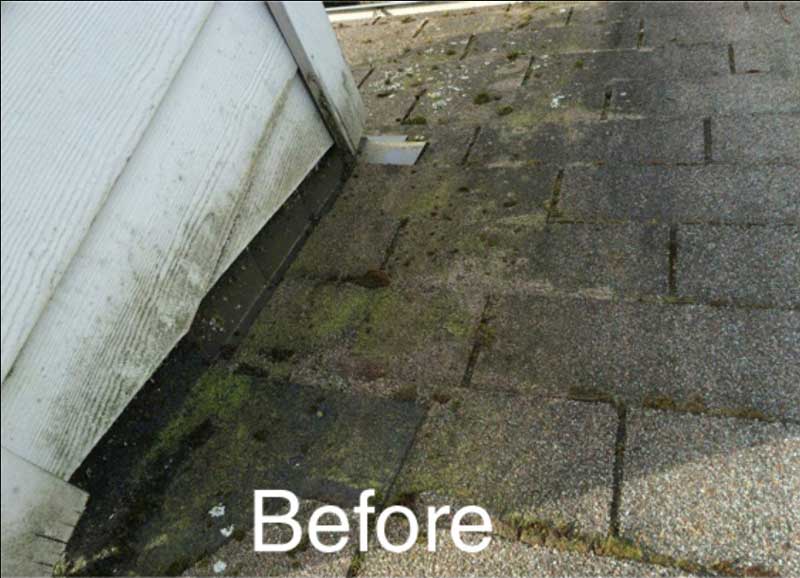
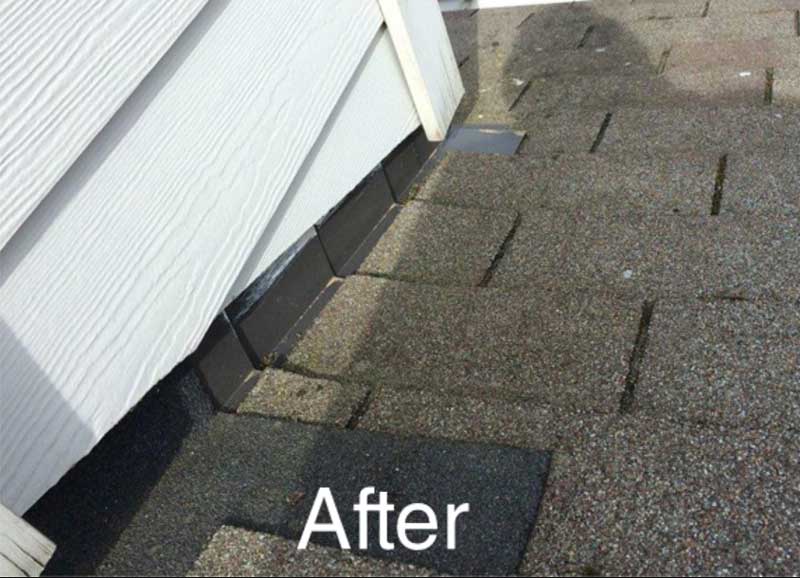
#5 - Remove Moss and Algae
Roof Moss is a persistent nuisance to roofs in the PNW. The presence of Algae and Moss on your roof is not only visually undesirable, but it’s actually doing long term damage to your asphalt and wood shingles over time. While many people treat their roofs with sprays in the late spring, applying additional treatments in the fall is helpful to prevent new growth from taking hold. Because we can expect more precipitation during the winter wet season, installing zinc strips near the ridge line is a great idea in the late fall.
Pro Tip: Moss is extremely slippery so take extra caution on a mossy roof.
Never use a pressure washer on your roof as it will weaken your roofing material.
(See Also: How To Extend The Life Of Your Roof)
#6 - Inspect flashing, vents and boots
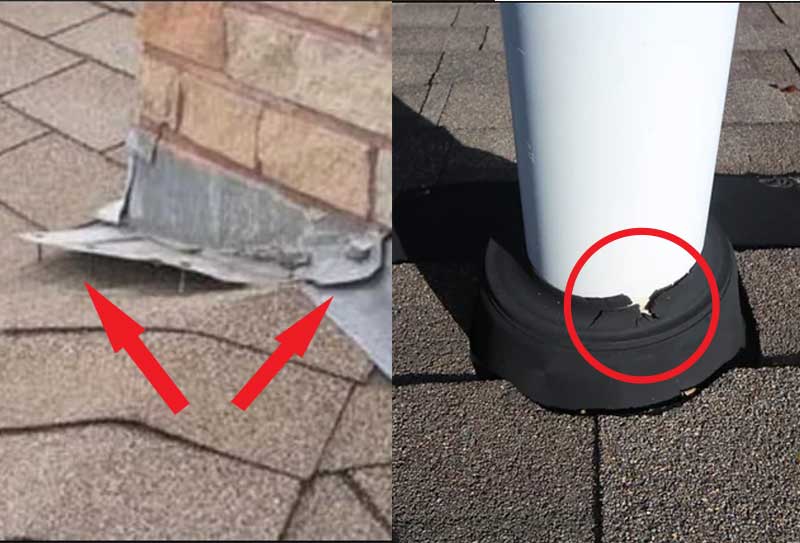
Assuming all of your shingles are in good shape with no gaps, the next weakest link in your roof’s ability to repel water will be the area’s around the vents (including plumbing boots), and where the roofing meets some flashing material. In theory these components should have a similar lifespan to your roofing material itself, however excessive UV rays, wind, animals, and the freeze / thaw cycles can abuse or even dislodge some of these items enough to allow water to seep in.
Rubber boots around plumbing vents will start to crack with age and UV light. A visual inspection is typically enough to spot these issues before they become critical and replacing them before they fail is preferable.
Likewise, flashing can start to wiggle over time due to shifting winds. Once the flashing becomes loose, water can weep into the nail holes and start to degrade them which only accelerates the process. If a section of flashing looks skewed or out of place for any reason, try moving it from side to side or lengthwise with your hand. Minor movements can be easily remedied, while a corroded or damaged strip of flashing is best being replaced entirely.
#7 - Roof Ventilation
A well ventilated roof is a happy roof!
This tip goes hand and hand with proper insulation. The main goal is to keep the air inside your home comfortably warm, while allowing for good circulation of the cooler air that is just below the roof’s surface. This will help in multiple ways and protect your roof from a variety of problems. We’ve actually covered this in our article about the Importance Of Proper Roof Ventilation, but here are some key points in relation to preparing your roof for the Seattle area winters.
If you have added insulation, be sure that it’s not impeding the air flow from your soffit vents. Because many people don’t even realize these small openings are really important, they often over-stuff insulation at the narrowest point of their attic space. This stops the area below your roof deck from being able to draw in fresh air.
Birds, Bees, and other critters may have nested around the eave soffits during the spring and summer. This can be one of the easier inspections for you to perform from the ground level. The good news is that any birds that made a nest there in the spring are probably long gone and won’t be using your roof soffits any longer. So you can knock those to the ground with something like an extendable painters pole without feeling guilty in the least bit.
Increasing the airflow in your attic also prevents issues with mold and premature rot in the wood framing of your roof system. Therefore circulating the air in the attic is just as important in the winter to increase your roof’s lifespan and keep the air inside your home free from dangerous mold particles.
#8 - Inspect Skylights and Chimneys
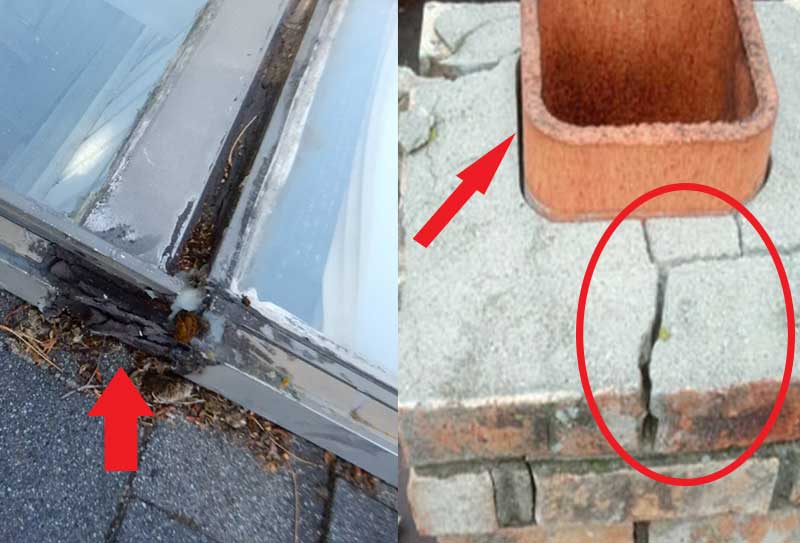
Similar to vents and roof boots, Skylights typically come with a trim kit that should last about as long as your roof. Falling debris or UV damage can weaken the trim around a skylight to the point that it creates an opportunity for wind driven rain or ice to penetrate your roofing and membrane system. Unlike vents and roof boots, you won’t be able to inspect the area below the roof deck to look for signs of watermarks. So it’s important to visually inspect the area of the roof to look for any irregularities in the trim and roofing around the skylight.
Chimneys present a unique challenge because this is where stone, metal, asphalt and tar are all working in conjunction to prevent water from entering your roofing system. The problem here is that all of those materials react differently to hot and cold cycles or wind and rain. This will eventually require flashing to be sealed at the edges, or mortar to be replaced sooner than the average roof itself needs to be replaced.
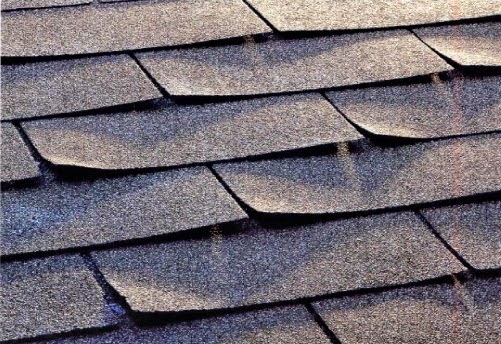
#9 - Replace missing or damaged shingles
This is going to sound like a “No-Brainer”, because of course you know that missing shingles are an invitation for disaster. However, shingles start to show signs of problems before they go missing and that’s what we want to address before the winter storms come through. As they age, shingles become less ‘elastic’ over time. This can result in ‘cupping’ or the lower edges of a shingle to no longer lay flat over the layer below it. Many people may not see a problem with this as water can reasonably still shed in a downward direction.
Areas close to Puget Sound and those homes that sit along some of our valleys can experience fierce gusts of wind during our winter storms. Every year we get calls from homeowners in Federal Way, Fife, Puyallup, Auburn, and around Lake Tapps for roof repairs after a storm. While we are happy to assist and serve these customers, it is never fun to be the bearer of bad news. In reality, most of these roof repairs would have been entirely preventable if we had been called out to make an inspection a few months prior.
#10 - Repair any nail holes
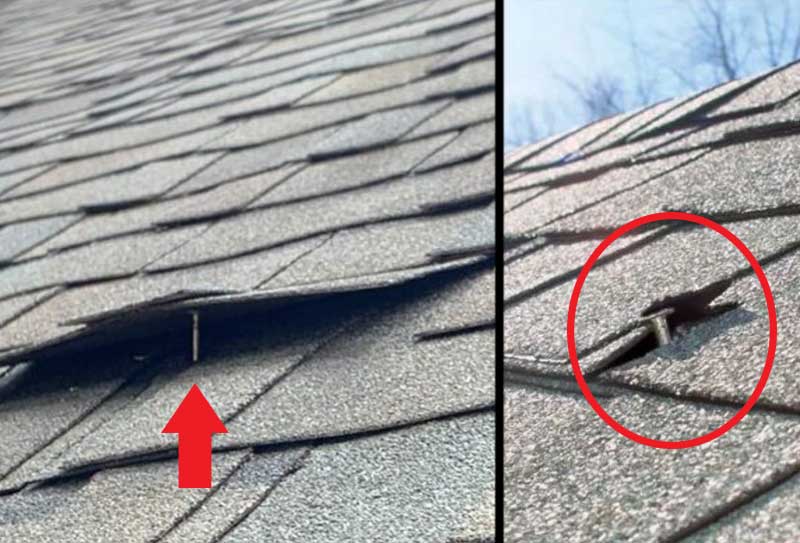
At first popped nails may lift the shingles above it.
Eventually they will punch through and leak water in.
As we mentioned with flashing that works its edges loose, this also happens with the nails that hold down each row of your roofing shingles. The industry term for these loosened nails is called ‘nail pops’ because the head of the nail eventually pops up through the shingles above it. When this occurs, not only does water have access through that layer of roofing, but the nail acts as a conduit for the water to penetrate through all the layers of membrane and soak into the wooden roof deck and surrounding support framing.
(See Also: How To Find and Fix A Roof Leak)
Spotting ‘nail pops’ isn’t always easy to an untrained eye, but if you develop a sense of what to look for they become more obvious. Once identified, a few popped nails can be remedied fairly quickly. However, if this phenomenon is showing up in larger areas, it can be a clear sign that you’re reaching the end of your roof’s lifespan. So while it might be easy to ignore a few little bumps in the roof, the result of not addressing it sooner than later, can mean the burden of extra costs when the need for a solution becomes unavoidable.
Bonus Tip:
Have Anytime Roofing give you a Free Roof Inspection!
As you may have noticed by now, a lot of the advice we give revolves around performing regular inspections and maintenance. To some, that might sound like self serving messaging or as if we had our own interests in mind. However this is genuine advice regardless of how you perform these inspections or maintenance tasks.
Many homeowners are experienced and well equipped to handle their own upkeep of their roof and make the necessary yearly roofing inspections and do so with pride. At the same time, others would rather avoid the perils of climbing a ladder multiple stories and working on their own roofs. Understandably so!
Regardless of who handles your regular roofing inspections and maintenance, we strongly encourage you to set a routine and follow it. As a local family owned roofing contractor, we would rather be called upon to handle these tasks or make simple repairs than have to get those emergency calls to come stop the water from doing more damage. That is why we work with our customers to set up routine inspections in advance and remind them when it’s almost time for their next roof inspection. Best of all, we offer our roof inspections for free!
Free Roof Inspection Request
We’re a strong believer in the phrase “If it ain’t broke, don’t fix it!”
There’s also no better feeling than telling someone that their roof is in good shape and doesn’t require anything at the present time. So if you would rather have a professional give your roof a look over than do it yourself, or you’re likely to let it go due to a busy schedule, Anytime Roofing is here for you. Just call, email, or message us… Anytime!